
Food photography with Rupa: Part 4 – Camera Angles

Creating the Perfect Flat Lay Like A Pro!
So far in this series, we’ve now covered:
Article 1: Camera Settings - how to clean your lens, lock focus and exposure, and use portrait mode to make your dish the star.
Article 2: Lighting - how to use natural light to bring out texture, colour and that fresh, vibrant look that makes people want to take a bite.
Article 3: Composition - the way you frame and arrange your food to guide your viewer’s eye and create real visual impact.
In this next step of our food photography foundations, we’re going to talk about something that’s often overlooked but makes a huge difference: Camera angles.
The angle you shoot from can transform the feel of an image, and today we’re focusing on one of the most used and misused angles in food photography: the flat lay (also known as an overhead shot).

Why Camera Angles Matter
Your camera angle is another layer of composition. It’s about how you hold your phone when photographing food and this one simple choice can either elevate your photo or flatten it (not in a good way!).
You’ve probably seen three main angles used in food photography:
Overhead / Flat Lay - looking straight down.
45-degree / Dining View - how we naturally see food on a table when seated.
Eye-Level - best for showing height, stacks, or layers.
Each one has a purpose and picking the right one is all about what you’re photographing and the story you’re trying to tell.

Why Focus on Flat Lays?
Let’s be honest the flat lay is everywhere on Instagram. And for good reason. When done well, it’s clean, stylish, and scroll-stopping.
But: flat lays don’t work for everything.
Flat lays work beautifully for:
Pasta-making scenes (like the one I shot for Part 3!)
Baking prep with flour, eggs, and props
Styled table spreads and grazing boards
Small bowls, toppings, herbs, spices
They don’t work as well for:
Tall food like burgers, pancake stacks, or layered desserts
Drinks with garnish or height (like frothy lattes or cocktails)
Flat lays work best when the details are spread out and when height isn’t the story. If your hero is a tall drink, stacked burger or frosted cake, you're better off using a different angle – like 45° or eye-level.

Creating a Flat Lay: My 7-Step Process
Here’s how I build a flat lay from scratch, and I’ve kept it simple, just like making a sandwich (yes, we’ve already used cake in a previous article, so let’s mix it up!).
Step 1. Start with a story
Think about what you want the photo to say. Is this a rustic pasta-making moment? A laid-back breakfast scene? A tropical dessert with a boozy twist?
Take this image for example, grilled caramelised pineapple, toasted coconut, spiced rum, and a bowl of silky vanilla cream. The deep blue backdrop gives that moody, island-after-dark vibe. It's sweet but grown up. The story here isn’t just dessert, it’s nostalgia, escape, indulgence.

Let your food tell a story and build your scene around that narrative. It will influence your background choice, the props you use, and the kind of light that works best.
Step 2. Choose your background
Your background should support the food not fight it. Think of it like casting the right co-star. The food is always the hero, and the background is there to elevate it, not distract from it.
When you're just starting out, I always recommend keeping things really simple. A textured table, a neutral backdrop, a baking tray, or even the back of a chopping board, these everyday surfaces often work beautifully. You don’t need anything fancy.
What matters most is that the background complements the story you're telling. For example, if you’re going for something rustic and cosy, a wooden table might be perfect. If you want something clean and vibrant, a pale ceramic tile or vinyl backdrop might do the job.
Once you get more confident, you can start experimenting with colours, textures, and even layering but at the start, simple really is best.

This shot uses a beautiful contrast of colour and texture. The rich, mauve-toned background has a subtle, gritty texture that adds mood and depth to the image without distracting from the star of the show, the fresh, silver sardines. The vintage, well-worn baking tray adds character and tells a quiet story of home cooking or rustic prep. It’s a great reminder that backgrounds don’t always need to be new or neutral, sometimes the worn, imperfect surfaces add soul to the frame
Step 3. Gather your props and ingredients
This is where your scene starts to come to life, think of it like casting characters in a story.
You’ve got your main hero (the dish), but it needs a supporting cast: utensils, herbs, ingredients, glassware, napkins, or even a splash of sauce or sprinkle of crumbs. These help tell the story and create visual texture.
PRO TIP: Keep it real. Choose props that make sense in the scene, not just pretty things for the sake of it. Sometimes less is more!
Make it look effortless and authentic, even if it takes a few tries to get there.

Step 5. Light it right
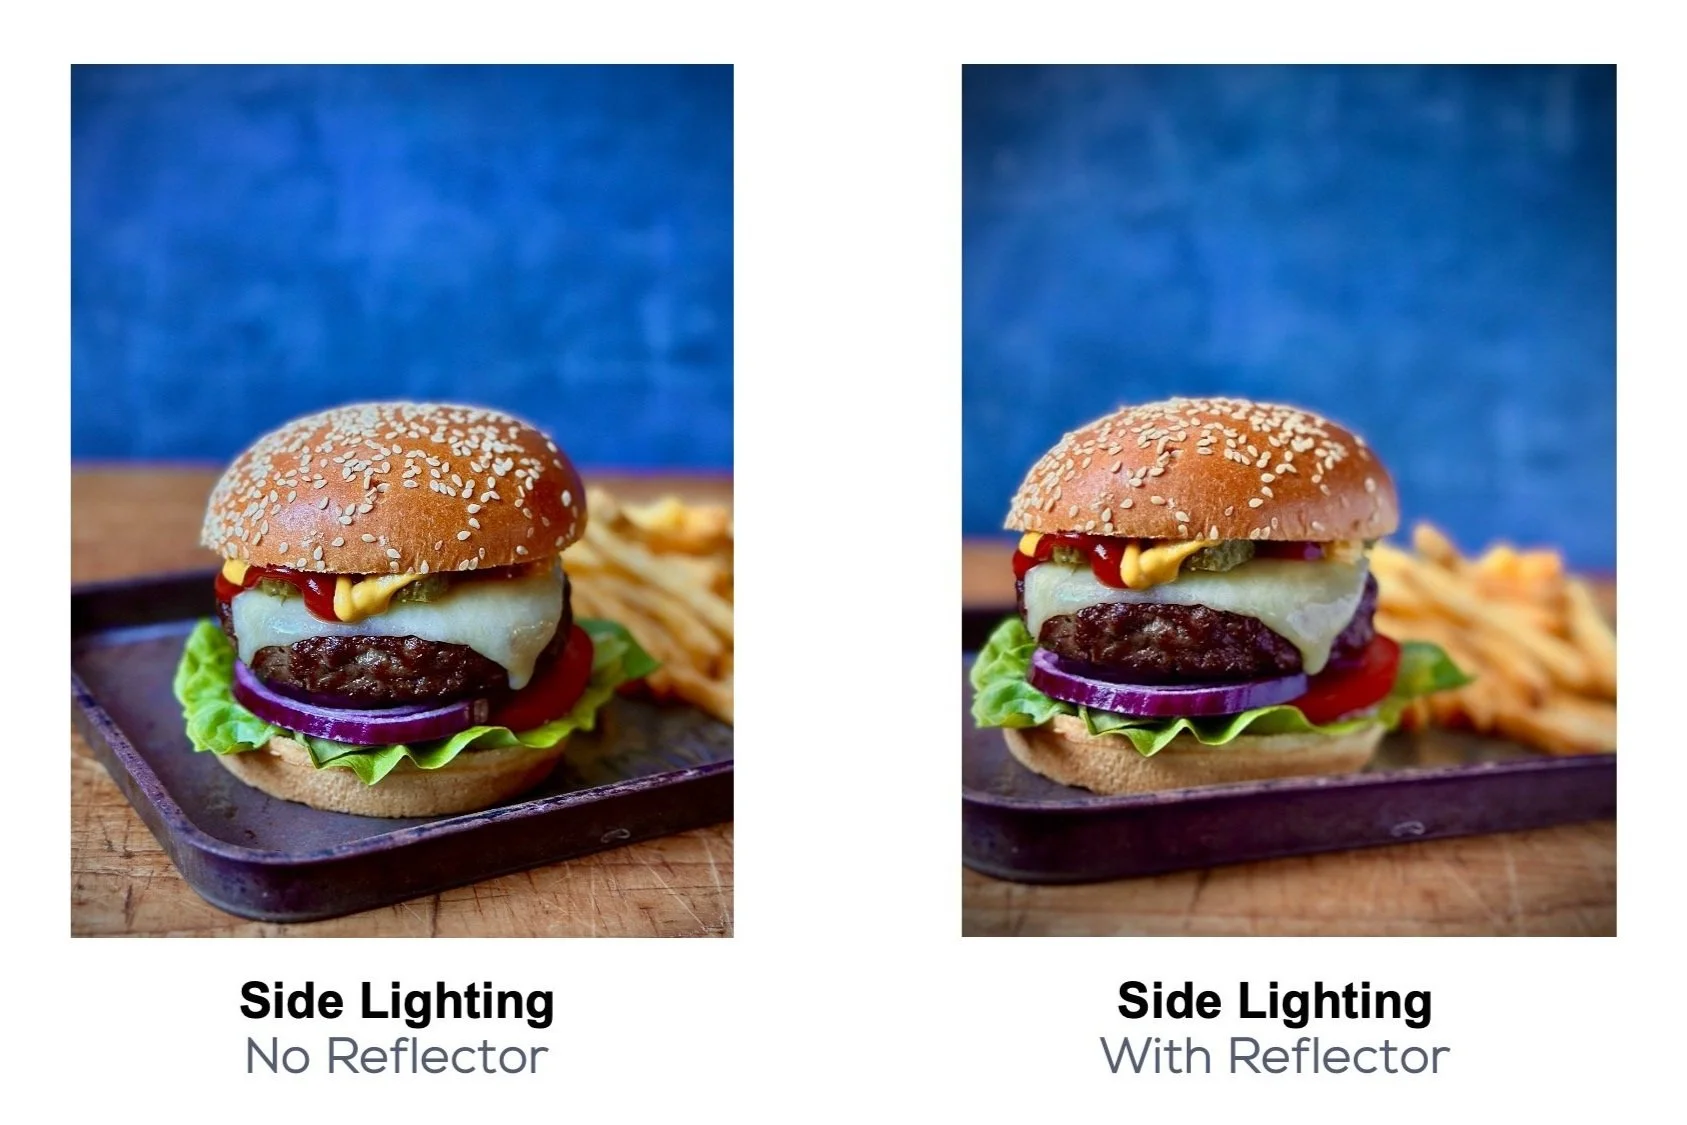
Use soft, natural light coming from the side, ideally from a nearby window. This helps to bring out the textures and colours in your food without harsh shadows or blown-out highlights.
Avoid switching on your overhead kitchen lights, they can create weird colour casts and flat, unflattering lighting.
Need a refresher? Go back to Article 2 on lighting for more tips on natural light and side lighting.

Step 6. Shoot in Photo Mode and stay parallel
Don’t use Portrait mode, just the standard Photo setting. For a flat lay, your phone needs to be parallel to the table.
Pro tip: Look for the crosses on your iPhone screen. When you line them up and they turn yellow, your phone is perfectly parallel. This tiny detail makes a big difference in getting a crisp, clean shot.

Step 7. Focus and adjust exposure
Once everything’s styled and ready, it’s time to lock in your shot.
Tap your hero item to focus, then slide up/down to brighten or darken the image. Take a few shots, then adjust your props as needed.
And if you’re not sure how to use your phone’s focus and exposure tools, don’t worry — we broke it all down in Article 1 of this series, so feel free to scroll back and give that a read for a quick refresher.
I often take 5 - 10 shots and tweak one thing at a time until I have the shot I want or to get a variety of different shots.

BONUS - Flat Lay Checklist
Set a clear story
Pick a background that suits the dish
Style with purpose (not clutter)
Light it with natural side light
Keep your camera parallel to the surface
Use the yellow cross tool for perfect alignment
Tap to focus + adjust exposure
What’s next?
Next time, we’re diving into styling and storytelling, the next big layer in food photography. This is where we elevate a beautiful photo into something that connects emotionally. I always say: Make your food camera-ready, not just plate-ready! And that’s exactly what we’ll cover.
Want to see this flat lay come to life? Head to my Instagram @iPhoneFoodPhotography where I’ve shared two behind-the-scenes videos.
And I’d love to see your flat lays too! If you try these steps, tag @iPhoneFoodPhotography so I can cheer you on and maybe even share your work. And whenever you review a recipe on ckbk, of course be sure to post a photo!
Honestly, flat lays are one of my favourite ways to shoot. They’ve got this beautiful, graphic quality to them and once you’ve nailed the basics, they’re such a fun way to tell a story with food. I hope you enjoy experimenting with them as much as I do, and I can’t wait to see what you create.
Rupa x

More ckbk features

Keep the recipes you need available in an instant using our new pinned recipe feature!
Rupa shows how to make the most of natural light to deliver great results

The way you frame and arrange your food to guide your viewer’s eye and create real visual impact