
Food photography with Rupa: Part 6 – Edit Like a Pro (Without Overthinking It)

Why Editing Matters (But Only If You’ve Nailed the Shot First)
Welcome back! We're now at one of the most anticipated parts of food photography, the edit. It’s where so many people think the magic happens. You’ll often hear the phrase “Oh, you can just fix that in the edit.” But I’m here to tell you: editing shouldn't be a crutch. It's not where the real magic happens. That starts in-camera. Editing is simply where we add the finishing touches. The sprinkle of sea salt. The drizzle of olive oil. A way to elevate the image, not disguise mistakes.
Whether you're editing a shot of your ingredients, the final dish, or anything in between, sweet or savoury, the rule still applies:
Keep it real. Keep it simple. Let the food shine.
Food is natural and people know what food should look like. We’re around it every day, and even subconsciously, we notice when something feels off. If an image is over-processed or doesn’t feel true to the dish, it breaks trust. That’s why your edit should always aim to enhance, not distort. Think of it as seasoning, not a full makeover. Keep it natural. Keep it honest. Let the food do the talking.

My Easy-to-Follow Editing Formula (In-App on iPhone)
Even though I’m walking you through this on the iPhone’s built-in editing tools, you can apply the exact same principles on Android phones or any third-party apps like Snapseed or Lightroom Mobile.
Contrast is contrast. Saturation is saturation. No matter where you're editing, these tools do the same thing and this process will still work beautifully.
This formula is all about keeping it quick, clear, and pro-level without getting overwhelmed or wasting time. It’s perfect for creators who want to polish their food photos but still real in under a few minutes, directly on their phones. Because food is natural. And over-editing makes it look, well… not very appetising. Let’s avoid that.
Let me show you how I do it.
Exposure
Exposure controls how bright or dark your image is.
It’s the overall lighting of your shot, and ideally, you’ll have this dialled in before you even press the shutter. But sometimes, especially if you're shooting handheld or in changing natural light, it might still need a tiny adjustment.
Use the slider to nudge the exposure up or down until the image feels well lit, not blown out, and not lost in the shadows.
Pro Tip:Try to find a balance between the highlights and shadows, so you retain details in both. You want a global light balance that works across the whole image.

2. Contrast
Contrast makes the darks darker and the lights lighter.
It gives your image punch, depth, and dimension, which is especially helpful in food photography where texture matters.
Just be gentle. Too much contrast can make your image look harsh or over-processed. I often increase contrast slightly, then bring it back down a touch so it still looks natural.
Pro Tip: Less is more with contrast. Start high so you can see the shift, then ease it back until it looks realistic and pleasing.

3. Saturation
Saturation adjusts the intensity of your colours.
This is the setting that most people go overboard with because yes, vibrant food pops on screen. But too much saturation and suddenly your tomatoes look radioactive.
You’re not trying to make your food look artificial. You’re aiming for colour that feels real and mouth-watering.
Pro Tip: Lift your saturation just enough to bring life into the image, but stop before it stops looking edible.

4. Warmth (White Balance)
Warmth controls the colour temperature, whether your image looks cool and blue or warm and golden.
This is technically called white balance, and while your phone auto-calculates this when you shoot, you might want to adjust it afterwards to suit the mood.
Cooler tones might feel fresh and crisp, while warmer tones feel rustic and comforting. Think about what suits the dish and the story you're telling.
Pro Tip: There’s no exact right or wrong here, go with what matches your brand style and the vibe you want to create. Warmer tones work beautifully for baked goods and homely scenes.

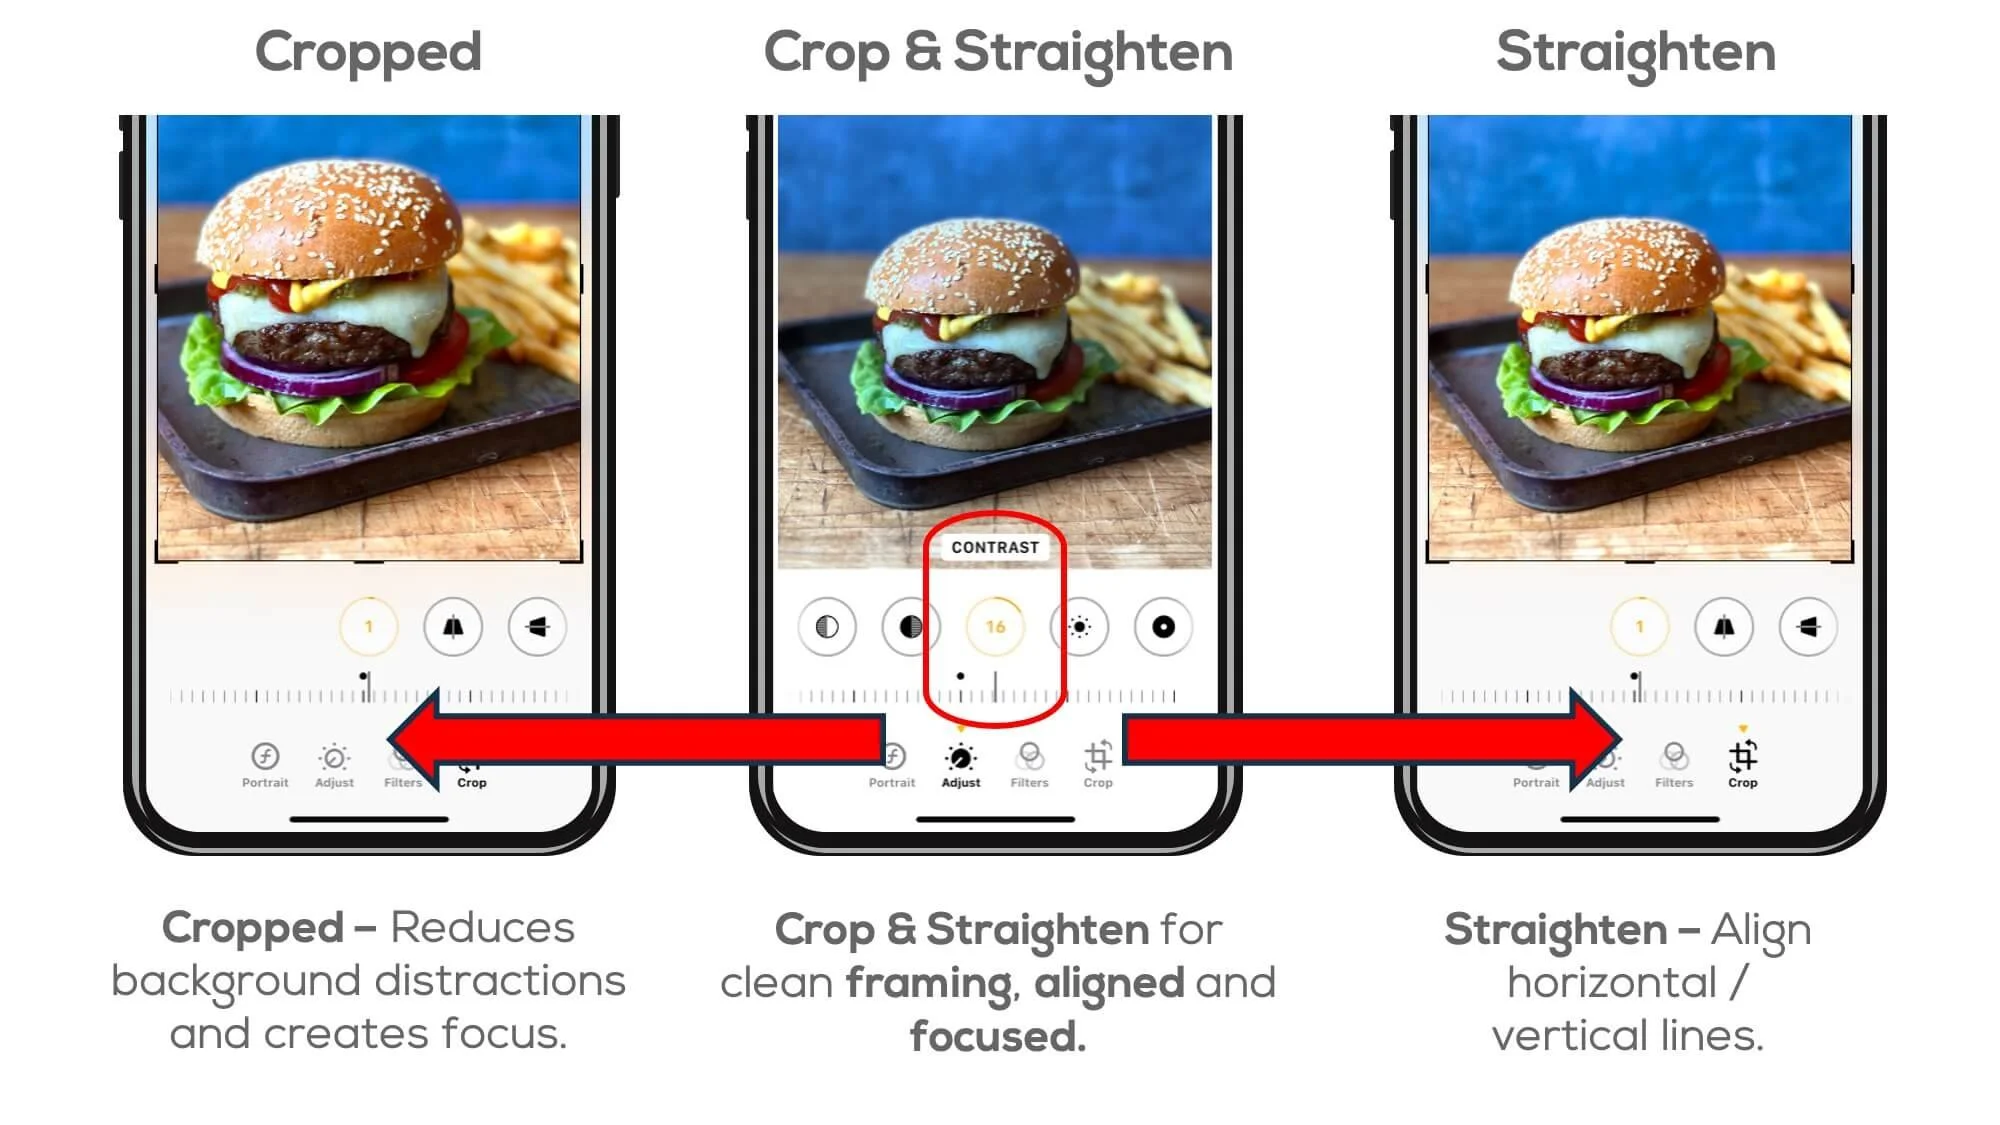
5. Crop and Straighten
This one gets overlooked, but it makes a big difference.
Cropping helps clean up your composition, removing clutter or distractions around the edges. Straightening ensures your plate or tray isn’t leaning awkwardly (unless that’s intentional).
Use your eye but also trust the grid lines – they are there to help.
Pro Tip:Switch on your phone’s grid in camera settings. It’ll help you line things up when shooting and make straightening a breeze later.
Bonus Tips
If you want to go a little deeper, here are three extra tools I use when needed:
Vignette - Adds a subtle dark edge around your image to draw attention to the centre
Highlights/Shadows - Great for recovering details in the brightest or darkest parts of the photo
Depth Adjustment (Portrait Mode only) - If you’ve shot using portrait mode and the blur looks odd, you can tap and adjust the focus depth afterwards
You can see all three of these bonus tips demonstrated in the video walkthrough (see below for how to get access to this).
The edit can only enhance, not rescue.
To show you exactly what I mean, here’s a simple before-and-after of a burger image I shot using natural light.

The photo on the left: No editing
The photo on the right: My simple 5-step iPhone edit
The difference is subtle, but powerful. The goal isn’t to transform the photo, it’s to refine and polish it.
I always say this to my students:
You can’t polish a bad photo.
If the lighting, composition and styling are off, no amount of editing will fix it. Get your photo right in camera and let editing be the final brushstroke.
Editing should be like seasoning, subtle, intentional, and always there to enhance what’s already good. It’s the final brushstroke, not the whole painting.
Before You Dive into Editing - Know Your Style
This is something people don’t talk about enough. Your editing style is like your signature; it should reflect your brand and your personality.
So, before you dive into editing, think:
What’s the visual vibe you want to be known for?
Are you soft and dreamy? Dark and moody? Light and fresh?
Be consistent. Be intentional. And make it yours.
Your editing choices should support your brand, not fight against it.
I like to keep things clean, punchy and bright, but still natural. That means I’ll boost contrast slightly and lift the colours, but I avoid anything that feels artificial. My work should always feel true to the food.

Food for Thought: Your Editing Style Is Part of Your Brand
Your editing style is a huge part of your brand identity.
Are your photos moody and shadowy? Or light and airy? Rustic and earthy? Or bold and modern?
If you’re not sure what your style is yet, start by studying photos you love. Go to your favourite cookbooks in CKBK and ask:
What is it about this image I like?
Is it the colour palette?
The lighting?
The styling?
The editing?
The more you consciously analyse what draws you to a photo, the more you’ll start to notice your preferences and build your own consistent style.

In Case You Missed It...
Here’s what we’ve covered so far in the series:
Article 1 - Settings and Camera Modes: How to make the most of your phone camera
Article 2 - Lighting: Working with natural light to make your food look delicious
Article 3 - Composition: Framing your shots using techniques like Rule of Thirds, Triangles, and Curves
Article 4 - Camera Angles: Choosing the right angle to tell the right food story
Article 5 - Styling and Storytelling: How to create mood, set a scene, and style your dishes naturally
Article 6 - Editing (you’re reading it!): Adding the final layer of polish without losing authenticity
Step 7 - Pulling It All Together (coming up next time): A behind-the-scenes walkthrough
Want to Learn These Steps in Action?
If you found this helpful and want to see how I edit in real time, I’ve created a special bonus just for readers of this series.
To join the waitlist send a DM on Instagram @iphonefoodphotography with the word CKBKEditing and we’ll add you to the waitlist and send you details on how to access the video walkthrough where I edit this image (and one other) from start to finish, using only my iPhone and the editing techniques I’ve shared in this article.
You’ll also get three bonus editing tips that aren’t included here, perfect for levelling up your food photos even more.
And if you’ve been feeling inspired to start styling and shooting your own food, whether that’s a batch of home-baked bread or your latest savoury masterpiece come join us over on @iphonefoodphotography. You’ll find loads more tips, behind-the-scenes reels, and support to help you create standout content that truly reflects your food story.
See you there.
Rupa xxx

More ckbk features

Keep the recipes you need available in an instant using our new pinned recipe feature!

Rupa shows how the angle you shoot from can transform the feel of an image, and offers tips to help you perfect your flat-lay

Food photography isn’t just about technical skills, the story you tell is just as important